
London · Guide for colourists, filmmakers, photographers and beauty brands
“Every skin tone sits on the same line of the vectorscope. The work is keeping each one true to the person in the chair.”
Colour grading skin tones is where beauty films are won or lost. A foundation film that turns deep skin grey or fair skin pink is selling the wrong shade, and a red lip that drifts orange is selling the wrong lipstick. This guide covers white balance, exposure across different skin tones, the vectorscope skin tone line, product colour accuracy and Log basics, with frames from the Code8 Day to Night Foundation film, the Waterproof red-lip film and Seacra's skincare portraits.
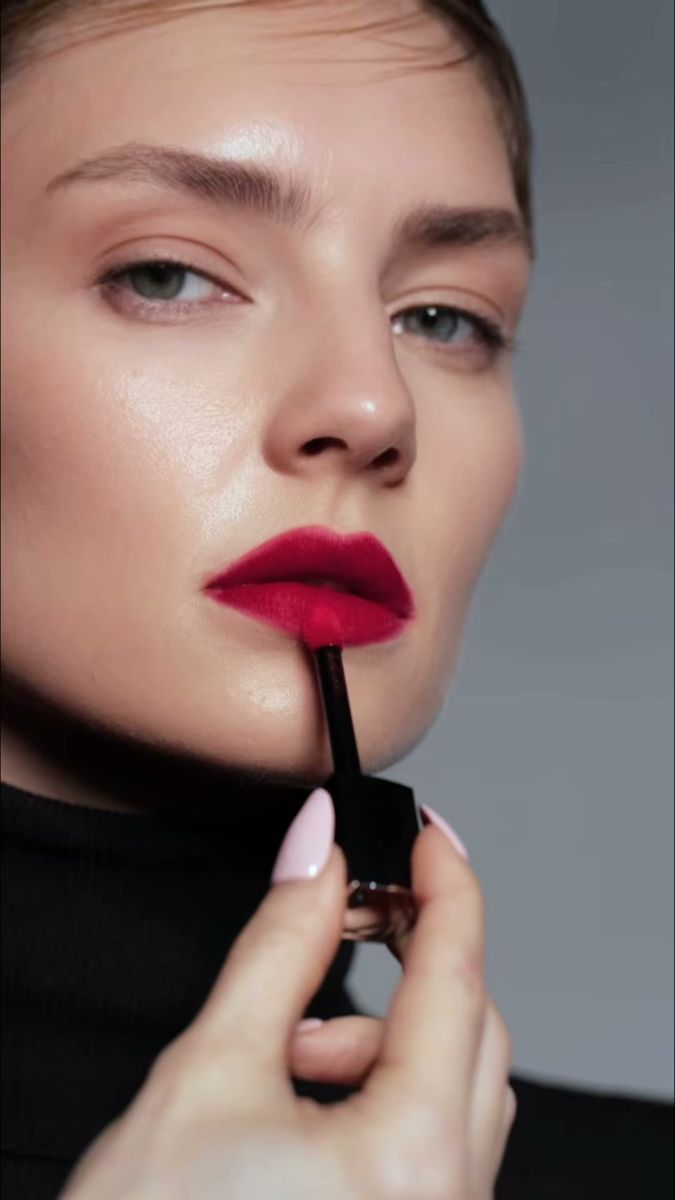
Waterproof · a red lip against a neutral grey backdrop
01 · The principle
Skin is graded on set before it is graded in the suite
Most skin tone problems in the grade were created on the day: a camera on auto white balance, a mix of daylight and warm practicals on one face, or a deep-skinned model exposed to the same brightness as a fair-skinned one. A colourist can fix a lot, but every correction costs something, usually noise in the shadows or a plastic look in the highlights. The cleanest grade starts with consistent capture.
The Code8 Day to Night Foundation shoot in London is a good model to copy. It was a white studio with models of different ages and skin tones, all in white shirts, lit by a large round softbox with black flags either side and a silver bounce in front. The camera monitor in the behind-the-scenes clip reads 1/100, f/5.6, ISO 250 and 5000K at 24p. That fixed 5000K matters more than any grade: every model and every shade of foundation was recorded under the same light and the same white balance, so the edit doesn't have to fight skin tones between shots. The full lighting breakdown is in the Code8 behind the scenes vs final film case study.
One white balance per set-up
Dial in a Kelvin value and lock it. Auto white balance can shift between shots as different skin, clothes and backgrounds fill the frame.
One colour of light on the face
Flag off windows or warm lamps that hit the skin. Mixed colour on one face is the hardest thing to fix later.
A neutral background
White, grey or black backdrops give the eye and the scopes a reference. Coloured walls bounce colour onto skin.
A chart at the top of each set-up
A few seconds of a colour chart in the model's position gives the grade a known starting point.
02 · White balance
White balance for skin: a card, a chart and a locked Kelvin
White balance sets what the camera treats as neutral. Do it from a white balance card or grey card held where the face will be, under the key light, then lock it. If you change the light, change the white balance on purpose, not by accident.
For beauty work a video colour chart is worth carrying. The X-Rite ColorChecker Video, for example, has grey steps for gray balance, saturated and desaturated colour chips, and six skin tone chips from light to dark with different undertones, plus a neutral white balance target on the back. Film it for a few seconds in each new set-up and each camera, and the colourist can balance and match cameras from the chart rather than guessing from a face.
Sources: AbelCine, X-Rite ColorChecker Video chart.
03 · Exposure
Consistent exposure across different skin tones

Code8 Day to Night Foundation · deep skin, the bottle shade and the lip all need to read true
"Consistent" doesn't mean every face at the same brightness. Skin reflects different amounts of light, so a single target value is wrong. Videomaker's guide to false colour puts it plainly: white skin renders best around 60 to 70 IRE, brown skin may show better at 48 to 52 IRE, and proper skin tone registers anywhere from about 42 to 78 IRE depending on its reflectance. Pushing deep skin up to a fair-skin level makes it look ashy and lifts the background with it; pulling fair skin down to match deep skin makes it grey.
What should be consistent is the lighting ratio and the white balance. Keep the same light, at the same distance, and let each face sit at its own natural level. On the Code8 group frame, a rectangular softbox on a tall stand lit all three models at once: one light, one exposure, three different and correct skin tones.
Use false colour or a waveform
Check each face on the scope rather than trusting a bright monitor in a dark studio.
Keep a highlight on deep skin
A soft specular sheen on the cheekbone and forehead gives deep skin shape. Matte, flat light makes it read as one tone.
Bounce, don't blast
A silver or white bounce under the face, as on Code8, lifts the eyes without flattening the whole face.
Protect fair skin highlights
Fair skin and white shirts clip first. Watch them on the scope before you add light for darker skin in the same frame.
Sources: Videomaker, how to use false color.
04 · The vectorscope
The skin tone line: how to read it
The vectorscope shows hue as an angle and saturation as distance from the centre. Most grading software draws a skin tone line at about the 11 o'clock position, between red and yellow. As Videomaker explains, all skin, regardless of ethnicity, can be balanced on this line; skin tones should fall equally on both sides of it, and how far out they go (saturation) depends on the rest of the scene. Larry Jordan's explanation is that melanin mostly changes how light or dark skin is, while the hue comes largely from blood under the skin, which is why the same line works for everyone.
In practice: isolate the face with a window or qualifier so the background doesn't confuse the scope, and look at where the cluster of skin pixels points.
| The scope shows | What you see | The fix |
|---|---|---|
| Skin cluster sits clockwise of the line, towards red/magenta | Pink or sunburnt skin | Shift tint towards green or the hue slightly towards yellow |
| Skin cluster sits anticlockwise, towards yellow/green | Sallow or jaundiced skin | Add a little magenta or warmth |
| Cluster very short, close to the centre | Grey, ashy or lifeless skin | Check exposure first, then add saturation to skin only |
| Cluster very long | Orange, over-tanned skin | Pull saturation back on the skin, not the whole image |
Treat the line as a reference, not a target to snap every face onto. Skin naturally varies a few degrees either side, and a pale model with pink undertones should stay a little pink. The aim is that every face in the film looks like the same light hit it.
Sources: Videomaker, what are vectorscopes · Larry Jordan, setting skin colours accurately.
05 · Product colour
Product colour accuracy: the shade on screen must be the shade in the bottle


Waterproof · the red as a product shot, and the same red on skin
In a fashion film a colourist can push skin warmer for mood. In a beauty campaign the product colour is a claim. If a foundation shade, a concealer or a lipstick looks different on screen from the real thing, customers buy the wrong shade and return it. Grade skin and product together, and check the product last.
1. Ask the brand for the physical product and its approved shade reference before the grade, and view them under neutral light next to a calibrated monitor.
2. Shoot the product on its own, next to the chart, at the start of the day.
3. Grade the skin first, then check the product shot in the same light. If the product is off and the skin is right, fix the product with a qualifier, not a global shift.
4. Saturated reds and deep browns are easy to over-saturate. Check them on the parade and the vectorscope as well as by eye.
5. Get shade sign-off from the brand on a still, before the film is finished.
Waterproof, a red-lip beauty editorial shot in a Downtown Dubai residence by a team of three in one day, is a clean example of building a whole film around one product colour: the red appears on the lip, applied with a wand and a brush, as a swatch beaded with water and as ink blooming in water. With a neutral grey backdrop and a black high neck, nothing competes with the red, and the skin around it stays warm and real. Every final image was retouched by hand, frame by frame; the guide to beauty retouching that keeps skin texture shows how.
06 · Log and LUTs
Log and LUT basics for beauty
Log recording stores a flat, low-contrast image that keeps more detail in highlights and shadows, which helps when a frame holds both fair skin in a white shirt and deep skin. Sony's own guide explains that Log looks flat on a Rec.709 screen because the screen can't show its full range, and that Log needs grading, usually starting with a lookup table (LUT). A 3D LUT controls the hue, saturation and brightness of each colour.
Monitor through a LUT, record Log
Use a display LUT on the camera or monitor so the director and make-up artist judge skin on a normal-looking image.
Conversion first, look second
Apply the manufacturer's conversion to Rec.709, balance and match skin, then add any creative look on top.
Expose Log properly
Underexposed Log gets noisy in the shadows when lifted, and deep skin lives in those shadows. Follow the manufacturer's exposure guidance.
Creative LUTs are not skin-safe
A downloaded look can push every face orange. Check skin on the vectorscope after any creative LUT.
Sources: Sony, shooting with S-Log for color grading.
07 · One brand, many faces
Seacra: keeping a brand look across different skin tones

Seacra · fair skin in a warm interior, deep skin against a grey backdrop
The Seacra portraits show the opposite challenge to Code8. Here the settings change: a fair, freckled face with gel on the cheek in a warm interior, and a deep-skinned model with braids against a cooler grey backdrop. A brand feed needs these to sit side by side without one looking orange and the other cold. The bottle is the anchor: its white Red Algae Infused label and the gel on skin should look the same in every frame, and the skin should look true to each person.
The way to do that is to match the product and the neutrals across the set, then grade each face to its own skin tone line rather than forcing one warmth onto everyone. For the formats this content was made for, see the Seacra social content series and skincare and beauty content that converts.
Watch
Skin, shade and colour on screen
 Behind the scenes with Code8 Beauty
 Waterproof project
 Soft contrast. Balanced skin: Seacra
 Kelly Rutherford x Code8: behind the scenes

More guides
Keep reading
FAQ
Common questions
How do you colour grade skin tones correctly?
Start from footage shot with a locked white balance and one colour of light on the face. Balance from a grey card or chart, then isolate the skin and check it against the skin tone line on the vectorscope, adjusting hue and saturation on the skin rather than the whole image.
What is the skin tone line on a vectorscope?
A reference line at about the 11 o'clock position, between red and yellow. Skin of every ethnicity clusters around it; faces differ mainly in brightness and saturation rather than hue.
How do you expose different skin tones in the same shot?
Don't force every face to the same level. Use one consistent light and let each face sit at its natural brightness: fair skin higher, deep skin lower. Check with false colour or a waveform, protect highlights on fair skin and keep a soft sheen on deep skin.
Should I shoot Log for beauty and skincare videos?
Log helps when a frame holds bright and dark skin or white clothes, because it keeps more highlight and shadow detail. It needs proper exposure and a conversion LUT in the grade. Monitor through a display LUT on set so skin can be judged properly.
Written by Joshua Swain, who films and photographs beauty, skincare and fashion campaigns in London and Dubai. See the Code8 project page.