
London · Guide for photographers, retouchers and beauty brands
“Clean the skin. Don't erase it.”
Good beauty retouching is mostly invisible. Blemishes go, stray hairs go, the backdrop is evened out, and the light on the face is shaped a little further than the camera could manage. What stays is everything that makes skin look like skin: pores, fine texture, freckles and the shape of the face. This guide explains the core techniques (healing, dodge and burn, frequency separation), the order to use them in, where AI tools fit, and the UK advertising rule every beauty retoucher should know.
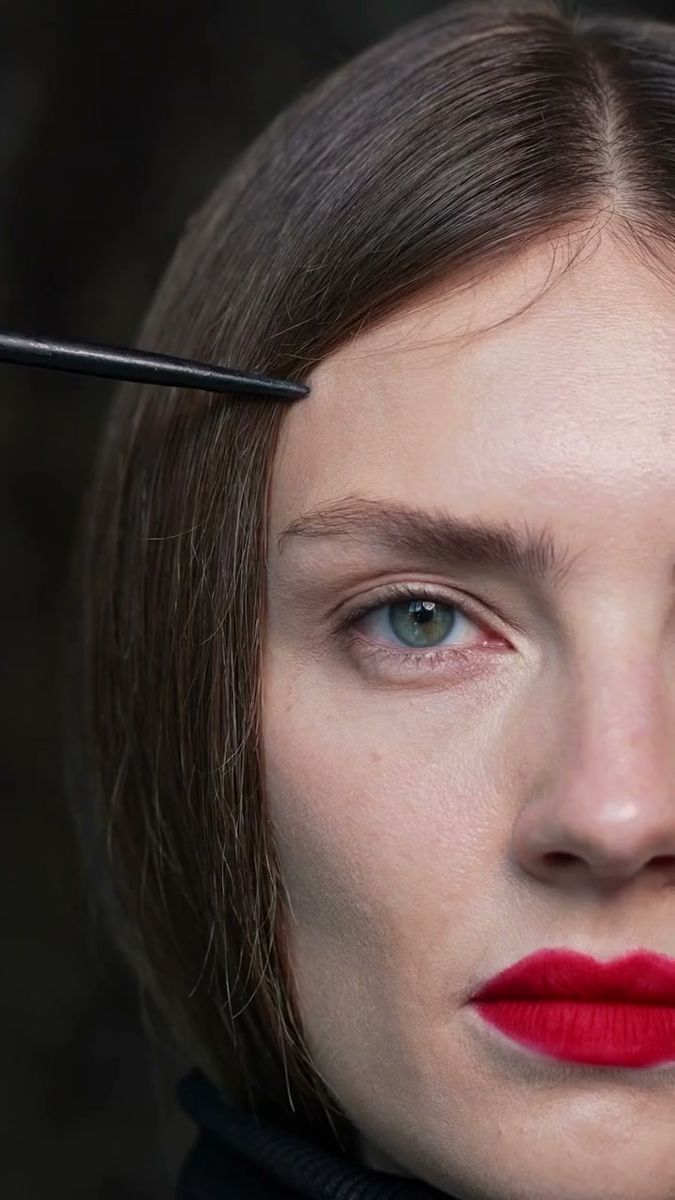
Texture on the cheek, a clean lip line · Waterproof, Dubai
01 · The principle
Temporary goes, permanent stays
The simplest rule for natural skin retouching: remove what would be gone in a week, keep what would still be there in a year. A spot, a scratch, redness from make-up removal, a stray hair across the cheek, dust on the backdrop: all temporary, all fair to clean. Pores, freckles, moles, the texture of the lips and the natural shape of the nose and jaw: permanent, and part of the person you photographed.
Work at 100%
Retouch with the image at full size and check the whole frame at the size it will be used. Smoothing that looks fine on a phone often falls apart on a billboard.
Everything on layers
Healing on its own layer, dodge and burn on adjustment layers. You can always dial back or show the client the raw frame.
Fix it on set first
Good make-up, a hair stylist watching for flyaways and soft, well-placed light save hours in post. Retouching is the last ten percent, not the first ninety.
Know the product
If you're shooting a foundation, a serum or a lip colour, the area where the product is visible must not be altered in a way that changes what it does.


Texture on the lips is part of the product story · Freckles kept, from the retouching tutorial on the SwainUK channel.
02 · Healing and cloning
Pick the right tool for each mark
Most skin cleaning in Photoshop is done with a handful of tools. The difference between them is how they choose the replacement pixels and whether they blend them into the surroundings.
| Tool | What it does | Use it for |
|---|---|---|
| Spot Healing Brush | Picks the source pixels for you and blends texture, light and shading with the area around it | Small, isolated spots on open skin |
| Healing Brush | You choose the source; it copies the detail and blends brightness and colour | Marks near edges (hairline, lip line, nostril) where the automatic choice gets it wrong |
| Clone Stamp | Copies pixels exactly, with no blending | Hard edges, backdrops, a crisp lip line; anywhere healing smudges |
| Patch | Replaces a selected area with a sampled one and blends it | Larger areas, such as a crease in a paper backdrop |
| Remove tool | Fills the area automatically, with an optional generative AI mode | Distractions and blemishes, checked closely afterwards |
Two habits keep texture intact. First, sample from skin with the same pore size and direction as the area you're fixing: pores on the nose are not pores on the cheek. Second, use a brush only slightly bigger than the mark. Big healing strokes average out texture and leave soft patches that read as "retouched" even when nobody can say why.
Sources: Adobe, Spot Healing Brush · Adobe, Remove tool · Expert Photography, healing vs clone.
03 · Dodge and burn
Shape light, not pixels
Dodging lightens, burning darkens. In beauty retouching it's used at two scales. Micro dodge and burn evens out small tonal bumps: the shadow inside an enlarged pore, a slightly dark patch under the eye, a line that the light has exaggerated. Macro dodge and burn shapes the face the way a make-up artist contours it: a little more light down the nose and on the cheekbone, a little more depth under it.
The reason retouchers prefer it to smoothing is simple: dodge and burn changes brightness only. It never blurs anything, so every pore stays where it was. The common non-destructive setup is two Curves adjustment layers, one pulled up (dodge) and one pulled down (burn), each with an inverted black mask, painted in with a soft white brush at very low flow. Setting the layers to the Luminosity blend mode helps keep the skin colour from shifting as you brighten or darken.
Helper view: add a temporary black and white layer on top with a little extra contrast. Uneven tone jumps out in monochrome.
Flow, not opacity: build up with a very low flow, many small strokes. Heavy strokes create new blotches.
Step back: turn the helper off and look at the whole face every few minutes. The goal is a smoother transition of light, not a different face.

Warm, directional light already does half the shaping · Beauty film with Philipp Jelenska, Dubai.
Sources: SLR Lounge, non-destructive dodging and burning · PetaPixel, dodge and burn to retouch skin.
04 · Frequency separation
Useful, and easy to overdo
Frequency separation splits an image into two layers. The high-frequency layer holds fine detail: hair, texture, pores and lines. The low-frequency layer holds colour, tone and shadow, with the detail blurred out. Because they're separate, you can even out a blotchy patch of colour without touching the texture above it, or heal a spot on the texture layer without dragging colour across the face.
The trouble starts when the low-frequency layer is blurred heavily across the whole face. Tone and shape go flat, and even with the pores technically still there, the skin reads as plastic. Cloning carelessly on the high-frequency layer causes the opposite problem: repeated texture patterns that look stamped on.
| Dodge and burn | Frequency separation | |
|---|---|---|
| Changes | Brightness only | Colour and tone (low) or texture (high), separately |
| Best for | Even skin, shaping the face, keeping every pore | Colour blotches, redness, fabric, backdrops, hairline fixes |
| Risk | Slow; patchy if strokes are heavy | Flat, plastic skin if the low layer is blurred everywhere |
| Speed | Slow, precise | Faster for large areas |
So frequency separation versus dodge and burn isn't really a contest. Many retouchers use frequency separation locally for colour problems and leave the light and shape of the skin to dodge and burn.
Sources: Adobe, frequency separation · Affinity Photo help, frequency separation.
05 · The order
A beauty retouch, step by step
Back in 2020 Joshua posted a short tutorial on the SwainUK channel, "Professional Retouch Photoshop 5 EASY STEPS", covering commercial retouching with healing, curves, colour work on the lips and eyes, a skin tone colour palette and a free lash brush. The order below follows the same logic, updated for current tools.
Raw and colour
Exposure, white balance and a neutral starting point before any skin work, so you're not retouching the wrong colours.
Clean
Spots, stray hairs, fluff on clothing, backdrop marks. Small brushes, matching texture.
Even
Micro dodge and burn, plus local colour fixes for redness or blotches.
Shape
Macro dodge and burn for cheekbones, nose and jaw. Keep the face recognisable.
Details
Lip line, brows, lashes, the whites of the eyes (lightly). Check skin tone against a few sampled reference values so it stays consistent across the set.
Finish
Final colour grade and sharpening for the output size. Compare against the raw frame side by side.
06 · The AI era
Faster tools, same rules
AI has made the cleaning stage much faster. Photoshop's Remove tool can repair blemishes and lift distractions out of a frame, with an optional generative AI mode, and one-click skin smoothing is built into plenty of apps. Used as a starting point, they save time. Used as the whole retouch, they produce the same smooth, poreless face on everyone, and audiences are learning to spot it.
In the UK there's also a rule to respect. In 2021 the Advertising Standards Authority ruled that social media ads for tanning products were misleading because influencers had applied beauty filters that exaggerated the effect of the product, and it has said filters shouldn't be used in ads where they're likely to exaggerate what a beauty product does. The same logic applies to AI and manual retouching: cleaning a stray hair is fine, changing how a foundation or serum appears to perform is not. We cover this in more detail in real people vs AI in advertising.

Water, highlights and pores all at once: exactly where automatic smoothing breaks down · Beauty film with Philipp Jelenska, make-up by Ido Raphael, Dubai.
Check AI fills at 100%
Generated patches can invent texture that doesn't match, or quietly change a lip line or an eye.
Keep the product area honest
No smoothing, no colour shift and no filter where the product is the point of the image.
Keep the raw
Archive the unretouched frame. If a claim is ever questioned, it's your evidence.
Sources: ASA, the (mis)use of social media beauty filters · Adobe, Remove tool.
07 · Example
Waterproof: retouched by hand, frame by frame


Frames from the Waterproof film, Dubai.
For Waterproof, a red lip beauty editorial shot in Dubai, every final image was retouched by hand, frame by frame: blemishes cleaned, backdrop evened, a careful dodge and burn, and a crisp lip line. The texture, pores and shape of the face were all kept. On a lip campaign that matters twice over: the edge and finish of the lip is the product, so it's the one place you sharpen and clean without changing colour or coverage.
If you're commissioning beauty work rather than retouching it, ask to see a raw frame next to a final. It tells you more about a photographer than the portfolio does. Our guide to skincare and beauty content that converts covers how to plan the shoot so there's less to fix.
Watch
Retouching and real skin


More guides
Keep reading
FAQ
Common questions
How do you retouch skin without losing texture?
Clean temporary marks with small healing strokes sampled from matching skin, then even tone with dodge and burn, which changes brightness only and leaves every pore in place. Avoid blurring the whole face, and check the result at 100%.
Is frequency separation better than dodge and burn?
They do different jobs. Frequency separation is quick for colour blotches and larger areas; dodge and burn is slower but keeps texture completely. Many retouchers use frequency separation locally and dodge and burn for the skin overall.
Can I use AI to retouch beauty photos?
For cleaning and removing distractions, yes, if you check every fill closely. In UK advertising, avoid any filter or retouch that exaggerates what a beauty product does; the ASA has ruled against ads that did.
What should natural skin retouching remove?
Temporary things: spots, stray hairs, redness, dust and backdrop marks. Keep permanent features such as pores, freckles, moles and the shape of the face.
Written by Joshua Swain, who shoots beauty campaigns in London and Dubai. See the Waterproof project.